Run AWS on Your Laptop: A 9-Part LocalStack Build Series (Part 1 - S3 Photo Uploader with Presigned URLs)
Build the first real app in the LocalStack series: an S3 bucket, CORS, presigned PUT URLs, and a tiny browser photo uploader.

If you've already worked through Part 0 - Setup, this is where the series starts feeling real. By the end of this article you'll have a working photo uploader where the browser sends files straight to an S3 bucket through a presigned URL. Same production pattern, just running on LocalStack on your laptop.
What we're building
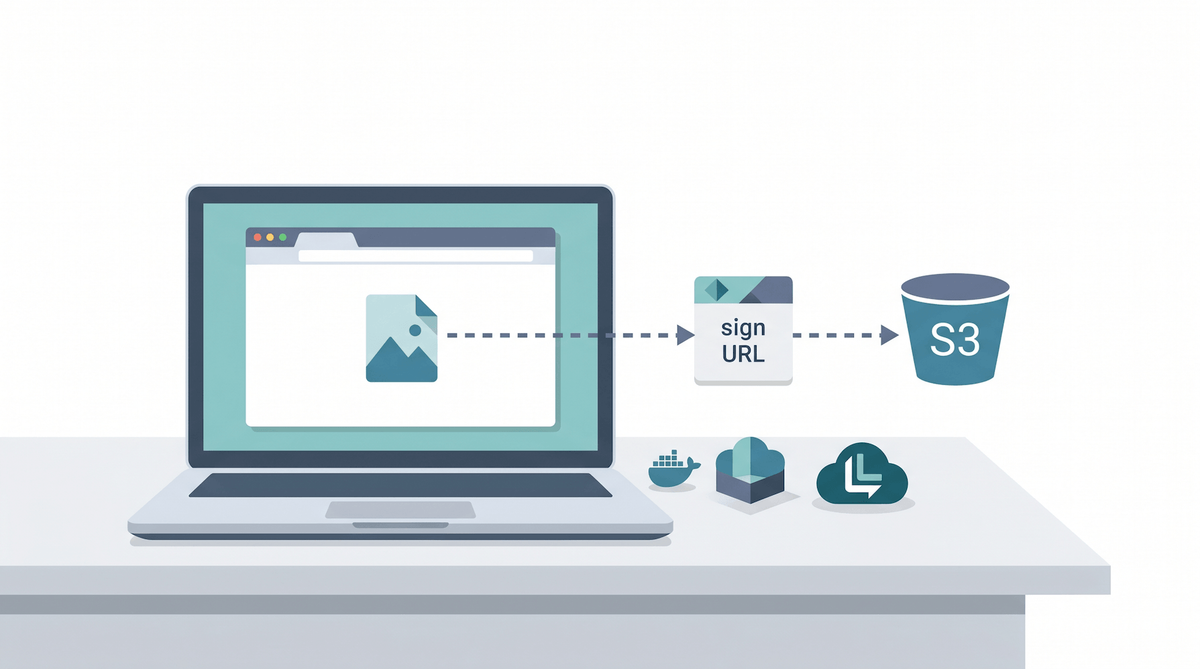
Browser  ─┐
          │  1. GET /sign?key=<filename>
          ▼
        Backend (Node)  ── 2. presigned URL ──▶ Browser
                                                  │
                                                  │  3. PUT file directly to S3
                                                  ▼
                                              LocalStack S3
                                              (bucket: photos)
A two-component app. The Node backend issues short-lived presigned URLs. The browser uses those URLs to upload files straight to S3 - the backend never sees the file bytes.
Why this pattern actually matters
If you're new to presigned URLs, this is the part where it clicks. Most beginner tutorials show you how to upload a file by streaming it through your backend: browser → backend → S3. That works for tiny files. It falls apart fast at scale because:
- Your backend handles every byte. A 50MB photo upload ties up a server worker for several seconds.
- Bandwidth is doubled (in to your backend, out to S3).
- Memory pressure climbs the moment you have a few concurrent uploads.
Presigned URLs flip this. Your backend signs a short-lived URL that authorises a single upload, then hands the URL to the browser. The browser uploads directly to S3. The backend is back to handling JSON-sized requests in milliseconds.
You'll see this pattern all over modern SaaS. Worth learning properly.
Step 1: Make a project folder for Part 1
We'll keep each part's code in its own subfolder under the series root from Part 0:
cd ~/projects/localstack-series
mkdir part1-s3-uploader
cd part1-s3-uploader
LocalStack should already be running. Quick check:
docker compose ps
awslocal s3 ls
If you see your hello-localstack bucket from Part 0, you're good to go.
Step 2: Create the photos bucket
awslocal s3 mb s3://photos
That's the storage half done. Next we need to tell the bucket it's allowed to accept uploads from a browser.
Step 3: Configure CORS on the bucket
The browser will be making a cross-origin PUT from http://localhost:3000 (our backend) to http://localhost:4566 (LocalStack S3). Without CORS configured, the browser will refuse the upload.
Create cors.json:
{
  "CORSRules": [
    {
      "AllowedHeaders": ["*"],
      "AllowedMethods": ["GET", "PUT"],
      "AllowedOrigins": ["*"],
      "ExposeHeaders": ["ETag"]
    }
  ]
}
Apply it:
awslocal s3api put-bucket-cors --bucket photos --cors-configuration file://cors.json
AllowedOrigins: ["*"] is fine for local dev. In production you'd lock this down to your real frontend origin.
Step 4: The backend - issuing presigned URLs
Set up the Node project:
npm init -y
npm install @aws-sdk/client-s3 @aws-sdk/s3-request-presigner
Then in package.json, set the type to module:
{
  "name": "part1-s3-uploader",
  "type": "module",
  "dependencies": {
    "@aws-sdk/client-s3": "^3.600.0",
    "@aws-sdk/s3-request-presigner": "^3.600.0"
  }
}
Create server.js:
import { S3Client, PutObjectCommand } from '@aws-sdk/client-s3';
import { getSignedUrl } from '@aws-sdk/s3-request-presigner';
import http from 'node:http';
import { readFileSync } from 'node:fs';

const s3 = new S3Client({
  endpoint: 'http://localhost:4566',
  region: 'us-east-1',
  forcePathStyle: true,
  credentials: { accessKeyId: 'test', secretAccessKey: 'test' },
});

const html = readFileSync('./index.html', 'utf8');

const server = http.createServer(async (req, res) => {
  if (req.url === '/') {
    res.setHeader('Content-Type', 'text/html');
    res.end(html);
    return;
  }

  if (req.url.startsWith('/sign')) {
    const url = new URL(req.url, 'http://localhost');
    const key = url.searchParams.get('key');
    const type = url.searchParams.get('type') || 'application/octet-stream';

    if (!key) {
      res.statusCode = 400;
      res.setHeader('Content-Type', 'application/json');
      res.end(JSON.stringify({ error: 'key is required' }));
      return;
    }

    const cmd = new PutObjectCommand({
      Bucket: 'photos',
      Key: key,
      ContentType: type,
    });
    const signedUrl = await getSignedUrl(s3, cmd, { expiresIn: 60 });

    res.setHeader('Content-Type', 'application/json');
    res.end(JSON.stringify({ url: signedUrl, key }));
    return;
  }

  res.statusCode = 404;
  res.end('not found');
});

server.listen(3000, () => console.log('Listening on http://localhost:3000'));
A few things worth understanding line by line:
endpoint: 'http://localhost:4566'- points the SDK at LocalStack instead of real AWS.forcePathStyle: true- the small but important LocalStack gotcha. As the LocalStack S3 docs explain, path-style requests are the safe default for local S3 work. Without this, the SDK builds URLs likehttps://photos.s3.amazonaws.com/...which won't resolve locally.credentials: { accessKeyId: 'test', secretAccessKey: 'test' }- LocalStack accepts any credentials by default. The strings can be anything.expiresIn: 60- the presigned URL is valid for 60 seconds. Long enough for a slow connection, short enough that a leaked URL isn't a long-term problem.
Step 5: The frontend - a tiny upload form
Create index.html next to server.js:
<!doctype html>
<html lang="en">
<head>
  <meta charset="utf-8">
  <title>Photo Uploader (LocalStack)</title>
  <style>
    body { font-family: system-ui; max-width: 480px; margin: 4rem auto; padding: 0 1rem; }
    button { padding: .5rem 1rem; }
    .ok  { color: #137333; }
    .err { color: #c5221f; }
  </style>
</head>
<body>
  <h1>Photo Uploader</h1>
  <p>Pick an image and upload it straight to LocalStack S3.</p>
  <input type="file" id="file" accept="image/*">
  <button id="upload">Upload</button>
  <p id="status"></p>

  <script>
    const $file   = document.getElementById('file');
    const $upload = document.getElementById('upload');
    const $status = document.getElementById('status');

    $upload.addEventListener('click', async () => {
      const file = $file.files[0];
      if (!file) return;

      const key = `${Date.now()}-${crypto.randomUUID()}-${file.name}`;
      const type = file.type || 'application/octet-stream';
      $status.className = '';
      $status.textContent = 'Getting presigned URL...';

      const params = new URLSearchParams({ key, type });
      const r = await fetch(`/sign?${params}`);
      const { url } = await r.json();

      $status.textContent = 'Uploading to S3...';
      const upload = await fetch(url, {
        method: 'PUT',
        body: file,
        headers: { 'Content-Type': type },
      });

      if (upload.ok) {
        $status.className = 'ok';
        $status.textContent = `Uploaded as ${key}`;
      } else {
        $status.className = 'err';
        $status.textContent = `Upload failed: ${upload.status}`;
      }
    });
  </script>
</body>
</html>
Two small but important details:
- The browser PUTs the file directly to the URL returned by the backend. Note the request goes to
localhost:4566, notlocalhost:3000- the backend is out of the picture once the URL is signed. - The
Content-Typeheader on the PUT must match what the backend signed. If they don't match, S3 returns a 403 with a "signature does not match" error. The code above uses the sametypevariable for both.
Step 6: Run it
node server.js
Then open http://localhost:3000 in a browser, pick a photo, and click Upload. You should see "Uploaded as 1714...-..." within a second.
Step 7: Verify the file in S3
awslocal s3 ls s3://photos/
Your uploaded file should be there with a Date.now()-prefixed key. To download it back and check:
awslocal s3 cp s3://photos/<your-key> ./downloaded.jpg
Or grab a presigned GET URL and view it in a browser:
awslocal s3 presign s3://photos/<your-key> --expires-in 60
Open the printed URL - your photo loads.
A real-world touch: auto-expiring uploads with a lifecycle rule
S3 lifecycle rules let you tell the bucket "delete anything older than N days". Genuinely useful for user uploads where you don't want to store everything forever.
Create lifecycle.json:
{
  "Rules": [
    {
      "ID": "expire-uploads-after-30-days",
      "Status": "Enabled",
      "Filter": { "Prefix": "" },
      "Expiration": { "Days": 30 }
    }
  ]
}
Apply:
awslocal s3api put-bucket-lifecycle-configuration \
  --bucket photos \
  --lifecycle-configuration file://lifecycle.json
In real AWS, S3 runs lifecycle expiration asynchronously, not the instant the clock flips. For this article, the useful bit is the bucket configuration itself: you can keep the same rule in local dev and production without changing your app code.
Common pitfalls
- CORS errors in the browser console. Re-check that you ran the
put-bucket-corscommand after creating the bucket. The error message looks like "blocked by CORS policy". - 403 SignatureDoesNotMatch on upload. The
Content-Typeyou sent in the PUT didn't match what the backend signed. Print both, line them up. getaddrinfo ENOTFOUND photos.s3.amazonaws.com. You forgotforcePathStyle: trueon the S3 client.- Presigned URL works for a few seconds then 403s. It's expired - you set
expiresIntoo low for a slow upload. Bump it to 300 (five minutes) for testing. - Server can't read
index.html. Runnode server.jsfrom thepart1-s3-uploader/folder, not from a parent.
Cleanup commands worth knowing
# Empty the bucket
awslocal s3 rm s3://photos --recursive

# Delete the bucket entirely
awslocal s3 rb s3://photos --force

# Or just stop the Node server with Ctrl+C - LocalStack keeps running
Don't actually delete the bucket if you plan to do Part 3 (the Lambda thumbnailer reads from this same bucket).
Save this as a checkpoint
State doesn't survive a docker compose down on the free Hobby tier, so let's bottle this part up as a script that recreates everything next time LocalStack starts. (Part 0 set up the init/ready.d/ folder and the docker-compose mount; we just drop a new file in it.)
Save as init/ready.d/01-part1-s3.sh:
#!/usr/bin/env bash
# Part 1 checkpoint - S3 photo uploader (bucket + CORS + lifecycle)
awslocal s3 mb s3://photos 2>/dev/null || true

awslocal s3api put-bucket-cors --bucket photos --cors-configuration '{
  "CORSRules":[{"AllowedHeaders":["*"],"AllowedMethods":["GET","PUT"],"AllowedOrigins":["*"],"ExposeHeaders":["ETag"]}]
}' 2>/dev/null || true

awslocal s3api put-bucket-lifecycle-configuration --bucket photos --lifecycle-configuration '{
  "Rules":[{"ID":"expire-uploads-after-30-days","Status":"Enabled","Filter":{"Prefix":""},"Expiration":{"Days":30}}]
}' 2>/dev/null || true

echo "[bootstrap] part 1 - photos bucket + CORS + lifecycle ready"
chmod +x init/ready.d/01-part1-s3.sh
Next docker compose up and your Part 1 setup is back. The 2>/dev/null || true keeps each command idempotent - re-running on an already-set-up bucket is harmless.
Jumping in at Part 1 from a fresh LocalStack? This script is all you need (Part 0 has no resources of its own beyond the smoke-test bucket).
What we'll wire up next
You've got a real upload flow running locally - same pattern as production SaaS apps, in 50-odd lines of code. The next part builds the data layer for our URL shortener using DynamoDB: single-table design, fixture loading, and the awslocal dynamodb commands you'll keep coming back to. Part 4 will wire it all to an HTTP API.
The full series
- Part 0 - Start here: series intro and installing LocalStack
- Part 1 - S3 locally: buckets, presigned URLs, and a tiny photo uploader (this article)
- Part 2 - DynamoDB locally: building a URL shortener data layer
- Part 3 - Lambda + S3 events: an image thumbnailer pipeline
- Part 4 - API Gateway + Lambda + JWT auth: a real HTTP API
- Part 5 - SQS + SNS: a background job queue with a dead-letter queue
- Part 6 - EventBridge + Step Functions: orchestrating a photo-processing workflow
- Part 7 - Secrets Manager + KMS: handling secrets and encryption locally
- Part 8 - Terraform (tflocal) + GitHub Actions: integration tests against LocalStack
Sources
Related Posts