Peek-a-Boo but with ESP32 - Upgrading the Traffic Light Controller with HC-SR04
Remember that traffic light controller I built? The one where my 2-year-old presses buttons and lights turn on? She still plays with it, but I wanted to add something different.
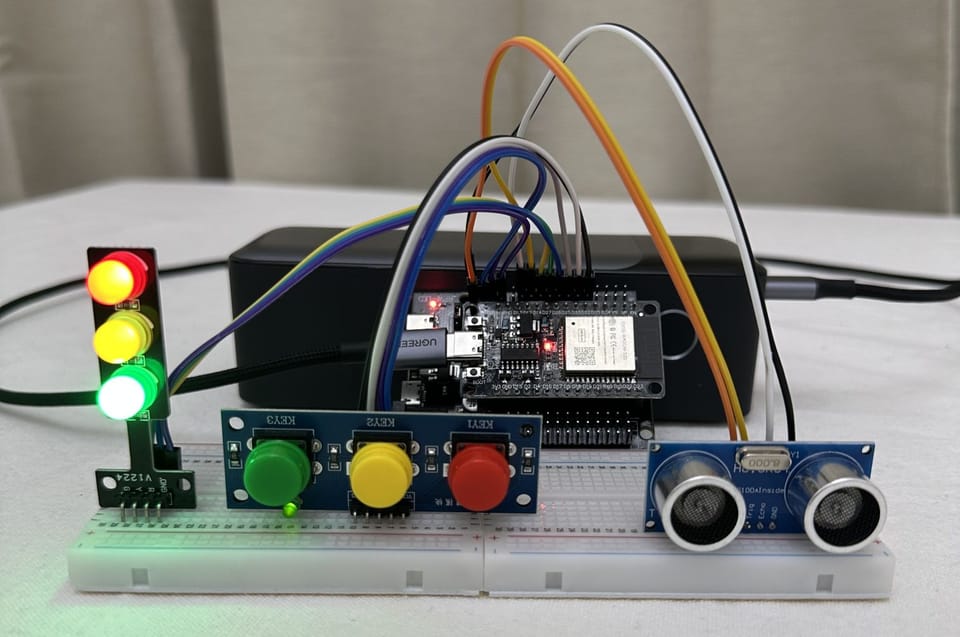
So I added a proximity sensor. Now the lights can also respond when she gets close, without needing to press anything.
This is a quick follow-up to the original traffic light project. If you haven't built that yet, go read that first. This article assumes you already have the basic setup working.
What We're Adding
I added an HC-SR04 ultrasonic sensor. It's that sensor you see on robot cars that measures distance. Costs about $2.
With it, I built two new modes:
Peek-a-Boo Mode: When she gets close, all the lights flash and stay on. Move away? Lights turn off. Get close again? Party lights! Simple and she figured it out immediately.
Distance Game Mode: Lights turn on progressively as you get closer. Far away = red. Medium distance = red + yellow. Close = all three. Too close? They start blinking.
Both modes work from the web interface. The original three modes (manual, traffic light, fast blink) still work exactly the same.
Security: I also improved the OTA authentication by switching from MD5 to SHA256 hash. Better security practice. To generate your hash:
echo -n "yourpassword" | sha256sum
Paste that into ota_password_hash at the top of the code. When Arduino IDE asks for your password during OTA upload, use your actual password, not the hash.
Shopping List (Just Two? Things)
You need:
- HC-SR04 Ultrasonic Sensor – The blue one everyone uses. $2-3 on AliExpress or Amazon. Look for the one that supports 3.3v - 5v. Though the 5v one will work fine also, if not, you will need to add a voltage divider.
- 4 Jumper Wires – Male-to-female if you're using a breadboard
- ESP32, Expansion Board (Optional) - Makes wiring a bit easier otherwise you can just use a breadboard and it will be fine.
That's it. If you built the original project, you already have everything else.
How the HC-SR04 Works
Quick science: the sensor sends out ultrasonic sound pulses (you can't hear them). When they bounce back, it measures how long that took. Sound travels at a known speed, so you can calculate distance.
The range is about 2cm to 4 meters. Accuracy is ±3mm, which is way better than we need.
It has four pins:
- VCC: Power (5V or 3.3V depending on the module)
- TRIG: You pulse this to trigger a measurement
- ECHO: Goes HIGH when measuring
- GND: Ground
You pulse TRIG for 10 microseconds, then read ECHO. The pulse width tells you the distance.
Wiring the Sensor
This is straightforward. Add these four connections to your existing setup:
HC-SR04 Sensor → ESP32
├── VCC  → 5V (or 3.3V)
├── GND  → GND
├── TRIG → GPIO 18
└── ECHO → GPIO 19
That's it. Everything else stays the same.
Power note: Most HC-SR04 modules work fine on 3.3V even though they're rated for 5V. I tested both and 3.3V worked perfectly. If you're being cautious, use 5V, but you'll probably need a voltage divider on the ECHO pin. I didn't bother and it's been fine.
The Code Changes
I'm not going to paste the entire code again (it's long). Instead, here's what changed:
1. Add the Sensor Pins
At the top with your other pin definitions:
// Proximity Sensor Pins
const int TRIG_PIN = 18;
const int ECHO_PIN = 19;
2. Add Configuration Values
These control how the modes behave:
// Peek-a-Boo Configuration
const int PEEK_DISTANCE_CM = 40;  // Trigger at 40cm (~16 inches)

// Distance Game Configuration
const int FAR_DISTANCE_CM = 100;      // Red turns on
const int MID_DISTANCE_CM = 80;       // Yellow turns on
const int CLOSE_DISTANCE_CM = 50;     // Green turns on
const int VERY_CLOSE_DISTANCE_CM = 30; // Start blinking
Play with these to tune it for your kid's height and reach.
3. Initialize the Sensor
In setup(), after you set up the LED pins:
pinMode(TRIG_PIN, OUTPUT);
pinMode(ECHO_PIN, INPUT);
digitalWrite(TRIG_PIN, LOW);

Serial.println("Waiting for sensor to stabilize...");
delay(1000);

// Warm-up readings - important for stability!
Serial.println("Warming up sensor...");
for (int i = 0; i < 10; i++) {
  digitalWrite(TRIG_PIN, LOW);
  delayMicroseconds(5);
  digitalWrite(TRIG_PIN, HIGH);
  delayMicroseconds(10);
  digitalWrite(TRIG_PIN, LOW);
  pulseIn(ECHO_PIN, HIGH, 30000);
  delay(150);
}
Serial.println("Sensor ready!");
The warm-up sequence is important. The HC-SR04 can give wonky readings right after power-on. Taking a few throw-away readings stabilizes it.
4. Add Two New Modes
Update the Mode enum:
enum Mode { MANUAL, TRAFFIC_LIGHT, FAST_BLINK, PEEK_A_BOO, DISTANCE_GAME };
5. Add the Sensor Functions
These handle reading the sensor and making it stable:
long getDistance() {
  digitalWrite(TRIG_PIN, LOW);
  delayMicroseconds(5);
  digitalWrite(TRIG_PIN, HIGH);
  delayMicroseconds(10);
  digitalWrite(TRIG_PIN, LOW);

  long duration = pulseIn(ECHO_PIN, HIGH, 50000);  // 50ms timeout

  // Filter out bad readings
  if (duration == 0 || duration > 25000) {
    return 0;
  }

  long distance = duration * 0.034 / 2;

  // Only return valid distances (2cm to 400cm)
  if (distance < 2 || distance > 400) {
    return 0;
  }

  return distance;
}

long getStableDistance() {
  long total = 0;
  int validReadings = 0;

  for (int i = 0; i < 3; i++) {
    long dist = getDistance();
    if (dist > 0 && dist < 400) {
      total += dist;
      validReadings++;
    }
    delay(10);
  }

  if (validReadings > 0) {
    return total / validReadings;
  }
  return 0;
}
The getDistance() function includes error checking to filter out bad readings. The sensor can sometimes timeout or return garbage data, so we validate everything.
The getStableDistance() function takes three readings and averages them. This smooths out jitter from the sensor.
6. Peek-a-Boo Mode Handler
This is the simple mode for toddlers:
void handlePeekaBooMode(unsigned long now) {
  static bool wasClose = false;
  static unsigned long lastCheck = 0;

  // Check sensor every 200ms
  if (now - lastCheck > 200) {
    long distance = getStableDistance();
    bool isClose = (distance > 0 && distance < PEEK_DISTANCE_CM);

    // Debug output
    Serial.print("Peek-a-Boo Distance: ");
    Serial.print(distance);
    Serial.print(" cm | Threshold: ");
    Serial.print(PEEK_DISTANCE_CM);
    Serial.print(" cm | Status: ");
    Serial.println(isClose ? "CLOSE" : "FAR");

    if (isClose && !wasClose) {
      // Baby just got close - PEEK-A-BOO!
      Serial.println("*** PEEK-A-BOO! ***");

      // Quick flash
      for (int i = 0; i < 3; i++) {
        digitalWrite(RED_LED, HIGH);
        digitalWrite(YELLOW_LED, HIGH);
        digitalWrite(GREEN_LED, HIGH);
        delay(100);
        digitalWrite(RED_LED, LOW);
        digitalWrite(YELLOW_LED, LOW);
        digitalWrite(GREEN_LED, LOW);
        delay(100);
      }

      // Leave them all on
      digitalWrite(RED_LED, HIGH);
      digitalWrite(YELLOW_LED, HIGH);
      digitalWrite(GREEN_LED, HIGH);

    } else if (!isClose && wasClose) {
      // Baby moved away
      Serial.println("*** Baby moved away ***");
      digitalWrite(RED_LED, LOW);
      digitalWrite(YELLOW_LED, LOW);
      digitalWrite(GREEN_LED, LOW);

    } else if (isClose) {
      // Baby still close - sparkle effect
      Serial.println("  Sparkling...");
      if ((now / 300) % 2 == 0) {
        digitalWrite(RED_LED, HIGH);
        digitalWrite(YELLOW_LED, HIGH);
        digitalWrite(GREEN_LED, HIGH);
      } else {
        int whichLight = (now / 300) % 3;
        digitalWrite(RED_LED, whichLight == 0);
        digitalWrite(YELLOW_LED, whichLight == 1);
        digitalWrite(GREEN_LED, whichLight == 2);
      }
    }

    wasClose = isClose;
    lastCheck = now;
  }
}
When the baby gets close, the lights flash three times then stay on. While they're standing there, the lights sparkle. When they move away, everything turns off.
My daughter figured this out in about 30 seconds.
7. Distance Game Handler
This one's more interactive:
void handleDistanceGameMode(unsigned long now) {
  static unsigned long lastCheck = 0;
  static long lastStableDistance = 0;
  static int stableReadings = 0;
  static unsigned long lastBlink = 0;
  static bool blinkState = false;

  if (now - lastCheck > 200) {
    long distance = getStableDistance();

    // Output distance for debugging
    if (distance > 0) {
      Serial.print("Distance: ");
      Serial.print(distance);
      Serial.println(" cm");
    } else {
      Serial.println("Distance: Out of range");
    }

    // Only update if changed significantly (more than 5cm)
    if (abs(distance - lastStableDistance) > 5) {
      lastStableDistance = distance;
      stableReadings = 0;
      Serial.println(">> Distance changed significantly");
    } else {
      stableReadings++;
    }

    // Use stable distance if we have consistent readings
    if (stableReadings > 2) {
      distance = lastStableDistance;
    }

    if (distance > 0 && distance < VERY_CLOSE_DISTANCE_CM) {
      // VERY CLOSE! Blink all lights fast!
      Serial.println(">>> VERY CLOSE - BLINKING!");
      if (now - lastBlink > 150) {
        blinkState = !blinkState;
        digitalWrite(RED_LED, blinkState);
        digitalWrite(YELLOW_LED, blinkState);
        digitalWrite(GREEN_LED, blinkState);
        lastBlink = now;
      }
    } else {
      // Not very close - use progressive lighting
      digitalWrite(RED_LED, LOW);
      digitalWrite(YELLOW_LED, LOW);
      digitalWrite(GREEN_LED, LOW);

      if (distance > 0 && distance < FAR_DISTANCE_CM) {
        // Within far range - turn on RED
        digitalWrite(RED_LED, HIGH);
        Serial.println(">> RED ON");

        if (distance < MID_DISTANCE_CM) {
          // Within medium range - also turn on YELLOW
          digitalWrite(YELLOW_LED, HIGH);
          Serial.println(">> RED + YELLOW ON");

          if (distance < CLOSE_DISTANCE_CM) {
            // Within close range - turn on all lights!
            digitalWrite(GREEN_LED, HIGH);
            Serial.println(">> ALL LIGHTS ON");
          }
        }
      } else if (distance > 0) {
        Serial.println(">> Too far - all lights OFF");
      }
    }

    lastCheck = now;
  }
}
It progressively lights up as you get closer, then starts blinking when you're very close.
8. Update the Loop
In your main loop() function, add cases for the new modes:
if (currentMode == MANUAL) {
  handleManualMode(now);
} else if (currentMode == TRAFFIC_LIGHT) {
  handleTrafficLightMode(now);
} else if (currentMode == FAST_BLINK) {
  handleFastBlinkMode(now);
} else if (currentMode == PEEK_A_BOO) {
  handlePeekaBooMode(now);
} else if (currentMode == DISTANCE_GAME) {
  handleDistanceGameMode(now);
}
9. Update the Web Interface
Add two new buttons to your HTML:
html += "<button class='btn btn-peekaboo' onclick='sendCommand(\"/mode/peekaboo\")'>👶 Peek-a-Boo</button>";
html += "<div class='info'>Lights flash when baby peeks close!</div>";
html += "<button class='btn btn-distance' onclick='sendCommand(\"/mode/distance\")'>🏃 Distance Game</button>";
html += "<div class='info'>Get closer to light up more LEDs!</div>";
And add the corresponding styles:
html += ".btn-peekaboo { background: #f74da2; }";
html += ".btn-distance { background: #e46411; }";
10. Add Web Routes
In setup(), after your existing routes:
server.on("/mode/peekaboo", handleModePeekaBoo);
server.on("/mode/distance", handleModeDistance);
And implement the handlers:
void handleModePeekaBoo() {
  currentMode = PEEK_A_BOO;
  digitalWrite(RED_LED, LOW);
  digitalWrite(YELLOW_LED, LOW);
  digitalWrite(GREEN_LED, LOW);
  Serial.println("Web: PEEK-A-BOO MODE");
  server.send(200, "text/plain", "OK");
}

void handleModeDistance() {
  currentMode = DISTANCE_GAME;
  digitalWrite(RED_LED, LOW);
  digitalWrite(YELLOW_LED, LOW);
  digitalWrite(GREEN_LED, LOW);
  Serial.println("Web: DISTANCE GAME MODE");
  server.send(200, "text/plain", "OK");
}
How to Use It
After uploading the code (remember, you can use OTA now!), open the web interface. You'll see two new buttons at the bottom.
Peek-a-Boo Mode: Tap it, then let your toddler walk up to the traffic light. When they get within 40cm, the lights celebrate. They'll figure out the game instantly.
Distance Game: Tap it, then stand far away and walk toward it. The lights progressively turn on as you get closer. Get too close and they start blinking.
You can still use all the original modes. The proximity sensor only does anything in these two new modes.
Wrapping Up
So there it is: two new proximity modes added with a $2 sensor and a couple of hours of tinkering. Working with the ultrasonic sensor taught me how distance sensing actually works and how to deal with noisy sensor data. That averaging technique? Turns out it applies to pretty much any sensor that gives you jittery readings.
But what makes projects like this worthwhile goes beyond the technical stuff. I get to learn while showing my daughter what IT and programming look like in a hands-on way. In an age where AI does everything, actually understanding how things work and being able to solve problems from scratch matters more than it used to. People are losing the ability to think through problems step by step. Building something like this lets me learn and improve while getting her interested early, paving the way for her to pick this stuff up when she's ready.
Full code is linked below. Everything from the original project still works; you're just stacking two new modes on top.
What's Next
I'm thinking about adding a sound element to this setup. Maybe a piezo buzzer or a small speaker that plays tones when the proximity sensor triggers. Kids respond well to audio feedback, and it would make the peek-a-boo mode more engaging.
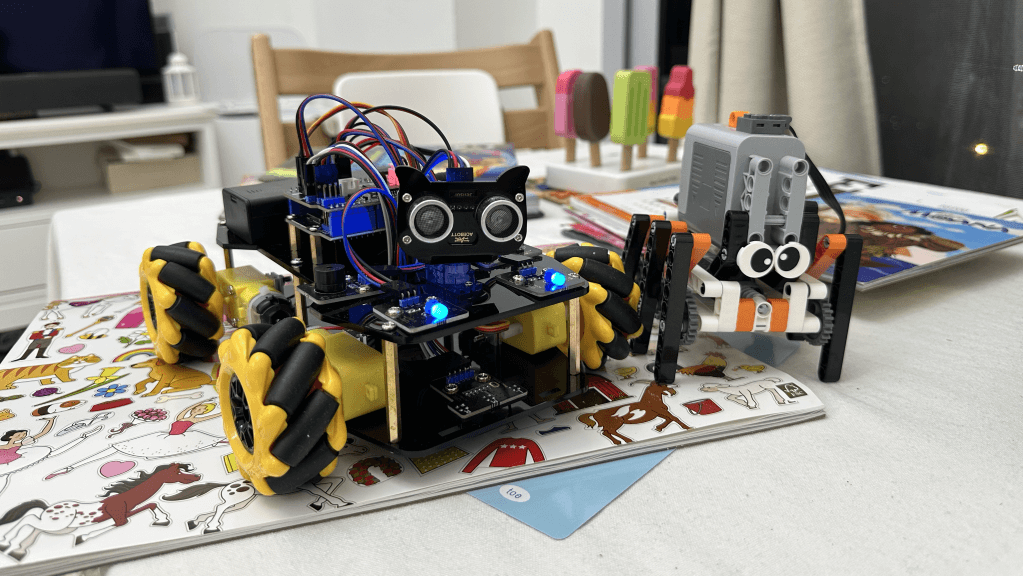
The bigger project I'm planning is building an Acebott Omni Wheel Car Robot over the Christmas holidays. It's a more complex build with omnidirectional movement, and I'm curious to see how much of it my daughter can participate in. It should be a good learning experience for both of us.
Resources
- Full Code: GitHub Gist - Remember to update the WiFi credentials, IP addresses, and OTA password hash at the top of the file
- More IoT Projects: GitHub Repository
- Original Traffic Light Article: Building a Traffic Light Controller
- HC-SR04 Datasheet: SparkFun Tutorial


Member discussion