Building a Traffic Light Controller for My 2-Year-Old: ESP32 with Web Interface & OTA Updates
There's something special about watching your kid's eyes light up when they press a button and something actually happens. Today I'm sharing a simple electronics project I built with and for my 2-year-old daughter.
My first real dive into electronics was years ago when I got into home automation. Bought some Xiaomi temperature and humidity sensors, then discovered I could flash them with custom firmware. Set up ESP32 boards running ESPHome as Bluetooth-to-WiFi bridges, and suddenly, temperature data from around my house was streaming into Home Assistant. The whole setup cost under $10 per room. These devices are awesome.
This is actually my second project with my daughter. The first one was dead simple, just some LEDs hooked up to a breadboard, powered through an ESP32. She loved connecting (at least trying) the LEDs to the jumper wires, but I wanted something more interactive this time. While browsing AliExpress (as you do at midnight), I found these traffic light modules and button modules. Perfect. Simple enough for a toddler to interact with, but interesting enough to keep me engaged.
Then I found out: you can run a full web server on these things. So not only can my daughter control the traffic lights with physical buttons, but I can also control them from my phone. Because why not?
Let me show you how I built it.
What We're Building
Here's what this thing does:
Three modes to play with:
- Manual mode: Press buttons (or tap your phone) to toggle each light
- Traffic light mode: Automatic cycling (red, yellow, green, repeat)
- Fast blink mode: Chasing light effect that looks way cooler than it sounds
Two ways to control it:
- Physical buttons your kid can actually press
- Web interface from your phone (because sometimes you're on the couch)
OTA updates: After the first upload, you can update the code wirelessly. No more crawling under the desk to plug in a USB cable.
What You'll Need
I kept this simple. Here's the shopping list:
- ESP32 Development Board – Any variant with WiFi works. I grabbed mine from AliExpress for a few bucks
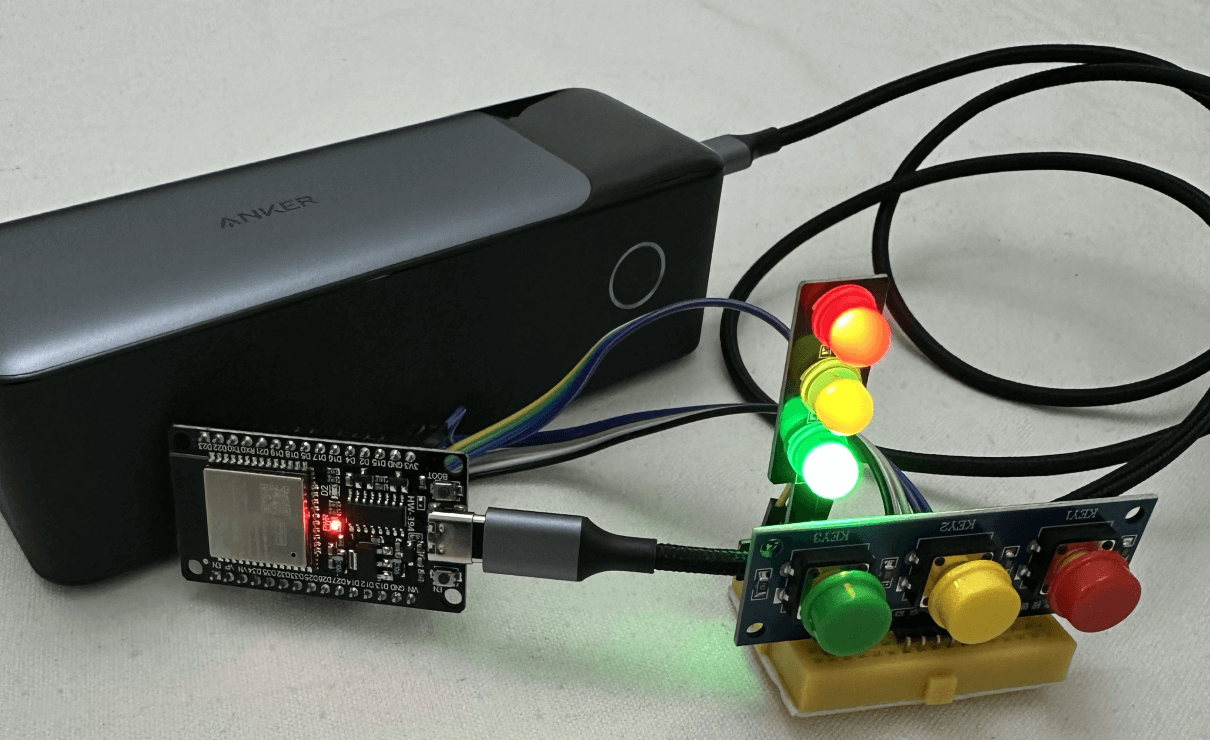
- Traffic light module – I used a pre-made module with red, yellow, and green LEDs already built in
- ST003 Three Switch Button Module – This thing is perfect. Three large buttons on one board with VCC, GND, and three button outputs. Way easier than wiring individual buttons, and the buttons are big enough for toddler hands
- Breadboard and jumper wires – The usual suspects
- USB cable – Just for the first upload
That's it. No resistors, no complicated wiring. The modules handle everything.
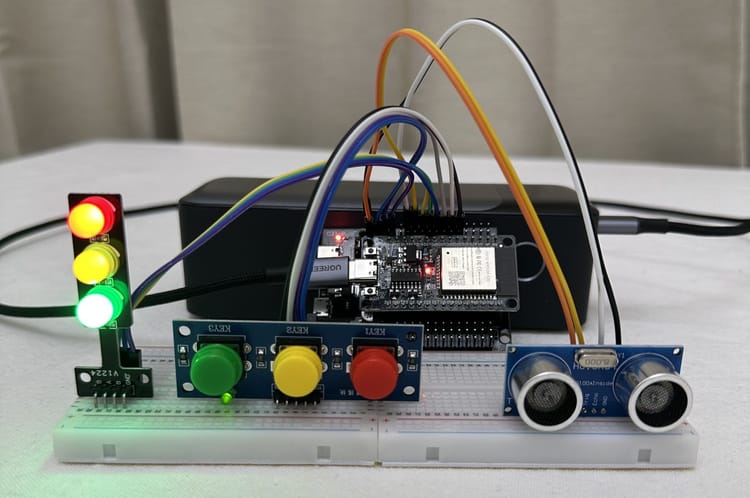
Wiring It Up
The wiring is straightforward:
Traffic Light Module:
├── Red LED → GPIO 25
├── Yellow LED → GPIO 26
└── Green LED → GPIO 27

ST003 Button Module:
├── VCC → 3.3V (ESP32)
├── GND → GND (ESP32)
├── Button 1 (Red) → GPIO 33
├── Button 2 (Yellow) → GPIO 32
└── Button 3 (Green) → GPIO 35
The ST003 module needs power (VCC and GND), and then each button output connects directly to a GPIO pin. The ESP32's internal pull-up resistors handle the button logic, so it just works. That's why I love these pre-made modules, no resistors, no fuss.
Setting Up the Software
If you haven't worked with ESP32 before, you'll need to set up Arduino IDE first:
Step 1: Get Arduino IDE
Download and install Arduino IDE.
Step 2: Add ESP32 Support
- Open File → Preferences
- Go to Tools → Board → Boards Manager
- Search for "ESP32" and install "esp32 by Espressif Systems"
In "Additional Board Manager URLs," paste this:
https://espressif.github.io/arduino-esp32/package_esp32_index.json
That's it. The libraries we need (WiFi, WebServer, ArduinoOTA) come bundled with the ESP32 board support.
First Time Setup Headaches
If you're new to ESP32 boards, you might run into some frustrating issues that'll make you want to pull your hair out. I did.
Driver Issues: The first problem I hit was the board not showing up in the IDE at all. Turns out, many cheap ESP32 boards use the CH340 USB-to-serial chip, which needs a separate driver. If your board isn't recognised, follow this guide to install CH340 drivers. It's straightforward and covers Windows, Mac, and Linux.
Boot Mode Problems: The second issue was even more annoying. Every time I clicked "Upload" in Arduino IDE, it would say "Connecting..." and just hang there. Sometimes I'd see an error like "Wrong boot mode detected (0x13)! The chip needs to be in download mode." Turns out my board needed to be manually put into boot mode. The fix: hold down the BOOT button on the ESP32 board when you see "Connecting..." appear in the IDE. Keep it pressed until the upload starts.
This is exactly why OTA updates are such a game-changer. After that first USB upload, you never have to deal with drivers or boot buttons again. Upload wirelessly and save your sanity.
The Code
Here's the complete implementation. Before uploading, change the WiFi credentials, IP addresses, and OTA password hash at the top of the file.
OTA Password Configuration
The code uses setPasswordHash() for OTA authentication, which requires an MD5 hash of your password rather than the plain text password.
To generate your MD5 hash:
- Choose a password (e.g., "mypassword123")
- Generate the MD5 hash using an MD5 Hash Generator
- Copy the hash into the
ota_passwordvariable
Example:
- Password:
mypassword123 - MD5 hash:
6c44e5cd17f0267f9d7a9c5a9e0e3e9a
When Arduino IDE prompts for your OTA password during wireless upload, enter your original password (not the hash).
Full Code
#include <WiFi.h>
#include <WebServer.h>
#include <ArduinoOTA.h>

// ========== WIFI CONFIGURATION - CHANGE THESE ==========
const char* ssid = "YOUR_WIFI_NAME";          // Change to your WiFi name
const char* password = "YOUR_WIFI_PASSWORD";  // Change to your WiFi password

// Static IP Configuration
IPAddress local_IP(192, 168, 1, 100);      // Change to your desired IP
IPAddress gateway(192, 168, 1, 1);         // Usually your router IP
IPAddress subnet(255, 255, 255, 0);        // Subnet mask
IPAddress primaryDNS(192, 168, 1, 1);      // Optional
// =======================================================

// OTA Configuration
const char* ota_hostname = "TrafficLight01";     // Name that appears in Arduino IDE
const char* ota_password = "YOUR_MD5_PASSWORD_HASH_HERE";  // MD5 hash of your password
// To generate: Visit https://www.md5hashgenerator.com/ and hash your password
// =======================================================

// Pin definitions - adjust these based on your actual wiring
const int RED_LED = 25;
const int YELLOW_LED = 26;
const int GREEN_LED = 27;

const int BTN_RED = 33;
const int BTN_YELLOW = 32;
const int BTN_GREEN = 35;

// ========== TIMING CONFIGURATION - ADJUST THESE ==========
// Traffic Light Mode Timings (in milliseconds)
const unsigned long TRAFFIC_RED_TIME = 4000;      // How long red stays on
const unsigned long TRAFFIC_YELLOW_TIME = 2000;   // How long yellow stays on
const unsigned long TRAFFIC_GREEN_TIME = 4000;    // How long green stays on

// Fast Blink Mode Timing (in milliseconds)
const unsigned long FAST_BLINK_TIME = 300;        // How long each LED stays on in sequence
// ==========================================================

// LED states for toggle mode
bool redState = false;
bool yellowState = false;
bool greenState = false;

// Button state tracking
bool lastRedBtn = HIGH;
bool lastYellowBtn = HIGH;
bool lastGreenBtn = HIGH;

// Debounce timing
unsigned long lastDebounce[3] = {0, 0, 0};
const int debounceDelay = 50;

// Triple press detection
int greenPressCount = 0;
int yellowPressCount = 0;
int redPressCount = 0;
unsigned long lastGreenPress = 0;
unsigned long lastYellowPress = 0;
unsigned long lastRedPress = 0;
const unsigned long tripleClickWindow = 1000;

// Mode control
enum Mode { MANUAL, TRAFFIC_LIGHT, FAST_BLINK };
Mode currentMode = MANUAL;

// Traffic light timing
unsigned long lastTrafficChange = 0;
int trafficState = 0;

// Fast blink timing
unsigned long lastBlinkChange = 0;
int blinkState = 0;

// Web server
WebServer server(80);

void setup() {
  Serial.begin(115200);
  Serial.println("Traffic Light Controller Starting...");

  pinMode(RED_LED, OUTPUT);
  pinMode(YELLOW_LED, OUTPUT);
  pinMode(GREEN_LED, OUTPUT);

  pinMode(BTN_RED, INPUT_PULLUP);
  pinMode(BTN_YELLOW, INPUT_PULLUP);
  pinMode(BTN_GREEN, INPUT_PULLUP);

  // All LEDs off initially
  digitalWrite(RED_LED, LOW);
  digitalWrite(YELLOW_LED, LOW);
  digitalWrite(GREEN_LED, LOW);

  // Configure static IP
  if (!WiFi.config(local_IP, gateway, subnet, primaryDNS)) {
    Serial.println("Static IP configuration failed!");
  }

  // Connect to WiFi
  Serial.println("Connecting to WiFi...");
  WiFi.begin(ssid, password);

  int attempts = 0;
  while (WiFi.status() != WL_CONNECTED && attempts < 20) {
    delay(500);
    Serial.print(".");
    attempts++;
  }

  if (WiFi.status() == WL_CONNECTED) {
    Serial.println("\n====================================");
    Serial.println("WiFi Connected!");
    Serial.print("Static IP Address: ");
    Serial.println(WiFi.localIP());
    Serial.println("====================================");
    Serial.print("Open this in your phone's browser: http://");
    Serial.println(WiFi.localIP());
    Serial.println("====================================");

    // Setup OTA
    setupOTA();
  } else {
    Serial.println("\nWiFi Connection Failed!");
    Serial.println("Controller will work with buttons only");
  }

  // Setup web server routes
  server.on("/", handleRoot);
  server.on("/toggle/red", handleToggleRed);
  server.on("/toggle/yellow", handleToggleYellow);
  server.on("/toggle/green", handleToggleGreen);
  server.on("/mode/manual", handleModeManual);
  server.on("/mode/traffic", handleModeTraffic);
  server.on("/mode/blink", handleModeBlink);
  server.on("/status", handleStatus);

  server.begin();
  Serial.println("Web server started");

  Serial.println("\nReady! Press buttons to toggle LEDs.");
  Serial.println("Press GREEN 3 times for traffic light mode");
  Serial.println("Press YELLOW 3 times for fast blink mode");
  Serial.println("Press RED 3 times to return to manual mode");
}

void setupOTA() {
  // Set OTA hostname
  ArduinoOTA.setHostname(ota_hostname);

  // Set OTA password hash
  ArduinoOTA.setPasswordHash(ota_password);

  // Port defaults to 3232
  // ArduinoOTA.setPort(3232);

  ArduinoOTA.onStart([]() {
    String type;
    if (ArduinoOTA.getCommand() == U_FLASH) {
      type = "sketch";
    } else { // U_SPIFFS
      type = "filesystem";
    }

    Serial.println("Start updating " + type);

    // Turn on all LEDs to indicate OTA update
    digitalWrite(RED_LED, HIGH);
    digitalWrite(YELLOW_LED, HIGH);
    digitalWrite(GREEN_LED, HIGH);
  });

  ArduinoOTA.onEnd([]() {
    Serial.println("\nEnd");
    // Blink all LEDs to indicate completion
    for (int i = 0; i < 5; i++) {
      digitalWrite(RED_LED, LOW);
      digitalWrite(YELLOW_LED, LOW);
      digitalWrite(GREEN_LED, LOW);
      delay(100);
      digitalWrite(RED_LED, HIGH);
      digitalWrite(YELLOW_LED, HIGH);
      digitalWrite(GREEN_LED, HIGH);
      delay(100);
    }
  });

  ArduinoOTA.onProgress([](unsigned int progress, unsigned int total) {
    Serial.printf("Progress: %u%%\r", (progress / (total / 100)));

    // Blink LEDs during upload
    static unsigned long lastBlink = 0;
    if (millis() - lastBlink > 200) {
      digitalWrite(RED_LED, !digitalRead(RED_LED));
      digitalWrite(YELLOW_LED, !digitalRead(YELLOW_LED));
      digitalWrite(GREEN_LED, !digitalRead(GREEN_LED));
      lastBlink = millis();
    }
  });

  ArduinoOTA.onError([](ota_error_t error) {
    Serial.printf("Error[%u]: ", error);
    if (error == OTA_AUTH_ERROR) {
      Serial.println("Auth Failed");
    } else if (error == OTA_BEGIN_ERROR) {
      Serial.println("Begin Failed");
    } else if (error == OTA_CONNECT_ERROR) {
      Serial.println("Connect Failed");
    } else if (error == OTA_RECEIVE_ERROR) {
      Serial.println("Receive Failed");
    } else if (error == OTA_END_ERROR) {
      Serial.println("End Failed");
    }

    // Flash red LED on error
    for (int i = 0; i < 10; i++) {
      digitalWrite(RED_LED, HIGH);
      delay(100);
      digitalWrite(RED_LED, LOW);
      delay(100);
    }
  });

  ArduinoOTA.begin();
  Serial.println("====================================");
  Serial.println("OTA Update Enabled!");
  Serial.print("Hostname: ");
  Serial.println(ota_hostname);
  Serial.println("====================================");
}

void loop() {
  unsigned long now = millis();

  // Handle OTA updates
  ArduinoOTA.handle();

  // Handle web server requests
  server.handleClient();

  if (currentMode == MANUAL) {
    handleManualMode(now);
  } else if (currentMode == TRAFFIC_LIGHT) {
    handleTrafficLightMode(now);
  } else if (currentMode == FAST_BLINK) {
    handleFastBlinkMode(now);
  }

  delay(10);
}

// ========== WEB SERVER HANDLERS ==========

void handleRoot() {
  String html = "<!DOCTYPE html><html><head>";
  html += "<meta name='viewport' content='width=device-width, initial-scale=1'>";
  html += "<style>";
  html += "body { font-family: Arial; text-align: center; margin: 20px; background: #f0f0f0; }";
  html += ".container { max-width: 400px; margin: 0 auto; background: white; padding: 20px; border-radius: 10px; box-shadow: 0 2px 10px rgba(0,0,0,0.1); }";
  html += "h1 { color: #333; }";
  html += ".status { font-size: 18px; margin: 20px 0; padding: 15px; background: #e8f4f8; border-radius: 5px; }";
  html += ".btn { width: 100%; padding: 20px; margin: 10px 0; font-size: 18px; border: none; border-radius: 5px; cursor: pointer; color: white; }";
  html += ".btn-red { background: #dc3545; }";
  html += ".btn-yellow { background: #ffc107; color: #333; }";
  html += ".btn-green { background: #28a745; }";
  html += ".btn-mode { background: #007bff; }";
  html += ".btn:active { opacity: 0.7; }";
  html += ".mode-section { margin-top: 30px; padding-top: 20px; border-top: 2px solid #ddd; }";
  html += ".ota-info { font-size: 12px; color: #666; margin-top: 20px; padding: 10px; background: #f8f9fa; border-radius: 5px; }";
  html += "</style>";
  html += "<script>";
  html += "function updateStatus() {";
  html += "  fetch('/status').then(r => r.json()).then(data => {";
  html += "    document.getElementById('mode').textContent = data.mode;";
  html += "    document.getElementById('red').textContent = data.red;";
  html += "    document.getElementById('yellow').textContent = data.yellow;";
  html += "    document.getElementById('green').textContent = data.green;";
  html += "  });";
  html += "}";
  html += "function sendCommand(url) {";
  html += "  fetch(url).then(() => setTimeout(updateStatus, 100));";
  html += "}";
  html += "setInterval(updateStatus, 1000);";
  html += "</script>";
  html += "</head><body>";
  html += "<div class='container'>";
  html += "<h1>Traffic Light Control</h1>";
  html += "<div class='status'>";
  html += "<strong>Mode:</strong> <span id='mode'>MANUAL</span><br>";
  html += "<strong>Red:</strong> <span id='red'>OFF</span> | ";
  html += "<strong>Yellow:</strong> <span id='yellow'>OFF</span> | ";
  html += "<strong>Green:</strong> <span id='green'>OFF</span>";
  html += "</div>";

  html += "<h2>Toggle LEDs</h2>";
  html += "<button class='btn btn-red' onclick='sendCommand(\"/toggle/red\")'>Toggle Red</button>";
  html += "<button class='btn btn-yellow' onclick='sendCommand(\"/toggle/yellow\")'>Toggle Yellow</button>";
  html += "<button class='btn btn-green' onclick='sendCommand(\"/toggle/green\")'>Toggle Green</button>";

  html += "<div class='mode-section'>";
  html += "<h2>Change Mode</h2>";
  html += "<button class='btn btn-mode' onclick='sendCommand(\"/mode/manual\")'>Manual Mode</button>";
  html += "<button class='btn btn-mode' onclick='sendCommand(\"/mode/traffic\")'>Traffic Light Mode</button>";
  html += "<button class='btn btn-mode' onclick='sendCommand(\"/mode/blink\")'>Fast Blink Mode</button>";
  html += "</div>";

  html += "<div class='ota-info'>";
  html += "OTA Enabled | Hostname: " + String(ota_hostname) + "<br>";
  html += "IP: " + WiFi.localIP().toString();
  html += "</div>";

  html += "</div>";
  html += "<script>updateStatus();</script>";
  html += "</body></html>";

  server.send(200, "text/html", html);
}

void handleToggleRed() {
  if (currentMode == MANUAL) {
    redState = !redState;
    digitalWrite(RED_LED, redState);
    Serial.println(redState ? "Web: Red ON" : "Web: Red OFF");
  }
  server.send(200, "text/plain", "OK");
}

void handleToggleYellow() {
  if (currentMode == MANUAL) {
    yellowState = !yellowState;
    digitalWrite(YELLOW_LED, yellowState);
    Serial.println(yellowState ? "Web: Yellow ON" : "Web: Yellow OFF");
  }
  server.send(200, "text/plain", "OK");
}

void handleToggleGreen() {
  if (currentMode == MANUAL) {
    greenState = !greenState;
    digitalWrite(GREEN_LED, greenState);
    Serial.println(greenState ? "Web: Green ON" : "Web: Green OFF");
  }
  server.send(200, "text/plain", "OK");
}

void handleModeManual() {
  currentMode = MANUAL;
  digitalWrite(RED_LED, LOW);
  digitalWrite(YELLOW_LED, LOW);
  digitalWrite(GREEN_LED, LOW);
  redState = false;
  yellowState = false;
  greenState = false;
  Serial.println("Web: MANUAL MODE");
  server.send(200, "text/plain", "OK");
}

void handleModeTraffic() {
  currentMode = TRAFFIC_LIGHT;
  trafficState = 0;
  lastTrafficChange = millis();
  Serial.println("Web: TRAFFIC LIGHT MODE");
  server.send(200, "text/plain", "OK");
}

void handleModeBlink() {
  currentMode = FAST_BLINK;
  blinkState = 0;
  lastBlinkChange = millis();
  Serial.println("Web: FAST BLINK MODE");
  server.send(200, "text/plain", "OK");
}

void handleStatus() {
  String json = "{";
  json += "\"mode\":\"";
  if (currentMode == MANUAL) json += "MANUAL";
  else if (currentMode == TRAFFIC_LIGHT) json += "TRAFFIC LIGHT";
  else json += "FAST BLINK";
  json += "\",";
  json += "\"red\":\"" + String(digitalRead(RED_LED) ? "ON" : "OFF") + "\",";
  json += "\"yellow\":\"" + String(digitalRead(YELLOW_LED) ? "ON" : "OFF") + "\",";
  json += "\"green\":\"" + String(digitalRead(GREEN_LED) ? "ON" : "OFF") + "\"";
  json += "}";
  server.send(200, "application/json", json);
}

// ========== BUTTON HANDLING ==========

void handleManualMode(unsigned long now) {
  bool currentRedBtn = digitalRead(BTN_RED);
  if (currentRedBtn == LOW && lastRedBtn == HIGH && (now - lastDebounce[0]) > debounceDelay) {
    if (now - lastRedPress < tripleClickWindow) {
      redPressCount++;
      if (redPressCount >= 3) {
        Serial.println("=== ALREADY IN MANUAL MODE ===");
        redPressCount = 0;
      }
    } else {
      redPressCount = 1;
    }
    lastRedPress = now;

    redState = !redState;
    digitalWrite(RED_LED, redState);
    Serial.println(redState ? "Red ON" : "Red OFF");
    lastDebounce[0] = now;
  }
  lastRedBtn = currentRedBtn;

  bool currentYellowBtn = digitalRead(BTN_YELLOW);
  if (currentYellowBtn == LOW && lastYellowBtn == HIGH && (now - lastDebounce[1]) > debounceDelay) {
    if (now - lastYellowPress < tripleClickWindow) {
      yellowPressCount++;
      if (yellowPressCount >= 3) {
        currentMode = FAST_BLINK;
        Serial.println("=== FAST BLINK MODE ACTIVATED ===");
        yellowPressCount = 0;
        lastBlinkChange = now;
        blinkState = 0;
        digitalWrite(RED_LED, LOW);
        digitalWrite(YELLOW_LED, LOW);
        digitalWrite(GREEN_LED, LOW);
        lastDebounce[1] = now;
        lastYellowBtn = currentYellowBtn;
        return;
      }
    } else {
      yellowPressCount = 1;
    }
    lastYellowPress = now;

    yellowState = !yellowState;
    digitalWrite(YELLOW_LED, yellowState);
    Serial.println(yellowState ? "Yellow ON" : "Yellow OFF");
    lastDebounce[1] = now;
  }
  lastYellowBtn = currentYellowBtn;

  bool currentGreenBtn = digitalRead(BTN_GREEN);
  if (currentGreenBtn == LOW && lastGreenBtn == HIGH && (now - lastDebounce[2]) > debounceDelay) {
    if (now - lastGreenPress < tripleClickWindow) {
      greenPressCount++;
      if (greenPressCount >= 3) {
        currentMode = TRAFFIC_LIGHT;
        Serial.println("=== TRAFFIC LIGHT MODE ACTIVATED ===");
        greenPressCount = 0;
        trafficState = 0;
        lastTrafficChange = now;
        digitalWrite(RED_LED, LOW);
        digitalWrite(YELLOW_LED, LOW);
        digitalWrite(GREEN_LED, LOW);
        lastDebounce[2] = now;
        lastGreenBtn = currentGreenBtn;
        return;
      }
    } else {
      greenPressCount = 1;
    }
    lastGreenPress = now;

    greenState = !greenState;
    digitalWrite(GREEN_LED, greenState);
    Serial.println(greenState ? "Green ON" : "Green OFF");
    lastDebounce[2] = now;
  }
  lastGreenBtn = currentGreenBtn;
}

void handleTrafficLightMode(unsigned long now) {
  bool currentRedBtn = digitalRead(BTN_RED);
  if (currentRedBtn == LOW && lastRedBtn == HIGH && (now - lastDebounce[0]) > debounceDelay) {
    if (now - lastRedPress < tripleClickWindow) {
      redPressCount++;
      if (redPressCount >= 3) {
        currentMode = MANUAL;
        Serial.println("=== RETURNING TO MANUAL MODE ===");
        redPressCount = 0;
        digitalWrite(RED_LED, LOW);
        digitalWrite(YELLOW_LED, LOW);
        digitalWrite(GREEN_LED, LOW);
        redState = false;
        yellowState = false;
        greenState = false;
      }
    } else {
      redPressCount = 1;
    }
    lastRedPress = now;
    lastDebounce[0] = now;
  }
  lastRedBtn = currentRedBtn;

  switch (trafficState) {
    case 0:
      if (now - lastTrafficChange > TRAFFIC_RED_TIME) {
        digitalWrite(RED_LED, LOW);
        digitalWrite(YELLOW_LED, HIGH);
        digitalWrite(GREEN_LED, LOW);
        trafficState = 1;
        lastTrafficChange = now;
        Serial.println("Traffic: YELLOW");
      } else if (now - lastTrafficChange == 0 || digitalRead(RED_LED) == LOW) {
        digitalWrite(RED_LED, HIGH);
        digitalWrite(YELLOW_LED, LOW);
        digitalWrite(GREEN_LED, LOW);
      }
      break;

    case 1:
      if (now - lastTrafficChange > TRAFFIC_YELLOW_TIME) {
        digitalWrite(RED_LED, LOW);
        digitalWrite(YELLOW_LED, LOW);
        digitalWrite(GREEN_LED, HIGH);
        trafficState = 2;
        lastTrafficChange = now;
        Serial.println("Traffic: GREEN");
      }
      break;

    case 2:
      if (now - lastTrafficChange > TRAFFIC_GREEN_TIME) {
        digitalWrite(RED_LED, HIGH);
        digitalWrite(YELLOW_LED, LOW);
        digitalWrite(GREEN_LED, LOW);
        trafficState = 0;
        lastTrafficChange = now;
        Serial.println("Traffic: RED");
      }
      break;
  }
}

void handleFastBlinkMode(unsigned long now) {
  bool currentRedBtn = digitalRead(BTN_RED);
  if (currentRedBtn == LOW && lastRedBtn == HIGH && (now - lastDebounce[0]) > debounceDelay) {
    if (now - lastRedPress < tripleClickWindow) {
      redPressCount++;
      if (redPressCount >= 3) {
        currentMode = MANUAL;
        Serial.println("=== RETURNING TO MANUAL MODE ===");
        redPressCount = 0;
        digitalWrite(RED_LED, LOW);
        digitalWrite(YELLOW_LED, LOW);
        digitalWrite(GREEN_LED, LOW);
        redState = false;
        yellowState = false;
        greenState = false;
      }
    } else {
      redPressCount = 1;
    }
    lastRedPress = now;
    lastDebounce[0] = now;
  }
  lastRedBtn = currentRedBtn;

  if (now - lastBlinkChange > FAST_BLINK_TIME) {
    digitalWrite(RED_LED, LOW);
    digitalWrite(YELLOW_LED, LOW);
    digitalWrite(GREEN_LED, LOW);

    switch (blinkState) {
      case 0:
        digitalWrite(RED_LED, HIGH);
        blinkState = 1;
        break;
      case 1:
        digitalWrite(YELLOW_LED, HIGH);
        blinkState = 2;
        break;
      case 2:
        digitalWrite(GREEN_LED, HIGH);
        blinkState = 0;
        break;
    }

    lastBlinkChange = now;
  }
}
How It Works
The Three Modes
I set this up with three different modes. You switch between them by triple-clicking the buttons.
Manual Mode (Default)
This is the basic mode. Press a button, the corresponding light toggles on or off. Simple. Works from the web interface too.
Traffic Light Mode (Triple-click GREEN)
Triple-click the green button and it starts cycling like a real traffic light:
- Red for 5 seconds
- Yellow for 2 seconds
- Green for 5 seconds
- Repeat
You can tweak these timings in the code. My daughter doesn't care about accuracy, but if you're building this for a model railway, you might.
Fast Blink Mode (Triple-click YELLOW)
This creates a chasing effect where lights blink in sequence. Looks cool, kids love it, that's about it.
Button Debouncing
Here's a fun problem: when you press a physical button, it doesn't cleanly go from off to on. It "bounces" and makes contact multiple times in milliseconds. Without debouncing, one press might register as three or four presses.
The fix is simple: wait 50ms after detecting a press before accepting another one.
const int debounceDelay = 50;  // 50ms debounce time

if (currentBtn == LOW && lastBtn == HIGH &&
    (now - lastDebounce) > debounceDelay) {
  // Button was actually pressed
}
Works perfectly. No phantom presses.
Triple-Click Detection
The triple-click thing is just counting button presses within a one-second window:
const unsigned long tripleClickWindow = 1000;  // 1 second window

if (now - lastPress < tripleClickWindow) {
  pressCount++;
  if (pressCount >= 3) {
    // Activate mode!
  }
}
Simple, but effective. Saves you from needing mode-select buttons.
Web Interface
This is where it gets fun. The ESP32 runs a web server, which means you can control everything from your phone.
Just connect to the same WiFi network, open a browser, and go to http://192.168.1.100 (or whatever IP you set). You'll see:
- Big buttons to toggle each light
- Mode switching controls
- Real-time status (auto-refreshes every second)
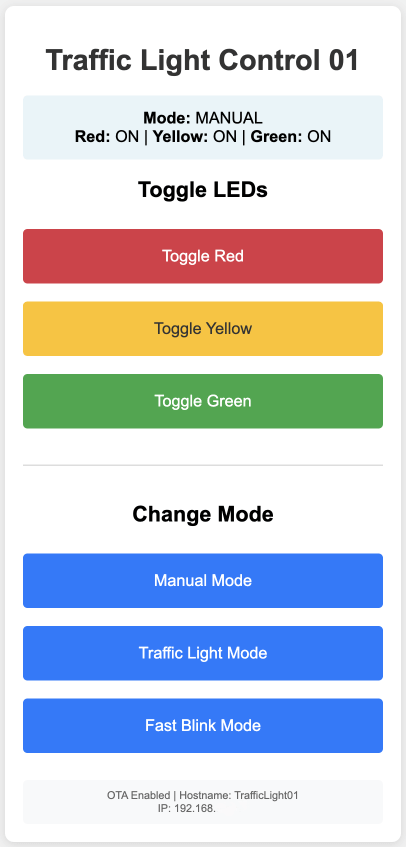
I built it with large touch-friendly buttons because nobody wants to squint at tiny UI elements on their phone.
Over-The-Air (OTA) Updates
Here's my favorite feature: after you upload the code once via USB, you never need to plug in again.
When you want to update the code:
- Open Arduino IDE
- Go to Tools → Port
- Select "TrafficLight at 192.168.x.x" (it'll show up as a network port)
- Click Upload
The ESP32 will give you visual feedback through the LEDs—they turn on when the update starts, blink during upload, then do five fast blinks when it's done. If something goes wrong, the red LED flashes.
This is a game-changer when your project is mounted somewhere inconvenient.
Setting It Up for Your Network
Before you upload the code, you'll need to change a few things.
WiFi Credentials
At the top of the code, replace these with your actual WiFi name and password:
const char* ssid = "YourWiFiName";
const char* password = "YourWiFiPassword";
Static IP
I set it to use a static IP so you always know where to find it. Change these values to match your network:
IPAddress local_IP(192, 168, 1, 100);    // Pick an unused IP
IPAddress gateway(192, 168, 1, 1);        // Your router's IP
IPAddress subnet(255, 255, 255, 0);       // Usually this
To find your router IP: check your phone's WiFi settings under your network details. Look for "Router" or "Gateway." Usually it's 192.168.1.1 or 192.168.0.1.
Timing Tweaks
Want faster traffic lights? Slower chase effect? Change these at the top of the code:
// Traffic Light Timings (in milliseconds)
const unsigned long TRAFFIC_RED_TIME = 5000;      // 5 seconds
const unsigned long TRAFFIC_YELLOW_TIME = 2000;   // 2 seconds
const unsigned long TRAFFIC_GREEN_TIME = 5000;    // 5 seconds

// Fast Blink Timing
const unsigned long FAST_BLINK_TIME = 300;        // 300ms per LED
Play around with these. I found 300ms works well for the chase effect: fast enough to look cool, slow enough for a toddler to track.
When Things Don't Work
WiFi Won't Connect
If the ESP32 isn't connecting to WiFi:
- Double-check your SSID and password (they're case-sensitive)
- Make sure you're using 2.4GHz WiFi (ESP32 doesn't support 5GHz)
- Move it closer to the router
- Open the Serial Monitor in Arduino IDE to see what error it's throwing
Buttons Acting Weird
If buttons trigger multiple times or don't respond:
- Check your wiring: button should go from GPIO pin to ground
- Make sure you set
INPUT_PULLUPin the code - Try increasing
debounceDelayto 100ms if you're using really cheap buttons
LEDs Have Different Brightness
If one LED is way brighter than the others, that's normal. Different colored LEDs have different voltage requirements. If it bugs you, you can add PWM dimming (I didn't bother for this project).
OTA Upload Isn't Working
If you can't see the network port or OTA fails:
- Make sure your computer and ESP32 are on the same WiFi
- Wait 30 seconds after the ESP32 boots before trying to upload
- Check if your firewall is blocking it
- When in doubt, restart Arduino IDE
- Worst case: upload via USB one more time
If You Want to Extend It
This is a solid foundation, but there's room to add more if you're feeling ambitious:
Add a buzzer: Wire a buzzer to GPIO 4 and call tone(BUZZER_PIN, 1000, 100) when buttons are pressed. Kids love sound feedback.
Add more modes: Create a fourth mode by adding it to the enum, writing a handler function, and adding a case to the switch statement. Rainbow mode? Strobe effect? Go wild.
Save state to EEPROM: Use the ESP32's Preferences library to remember the current mode even after a power cycle. Handy if you want it to boot into a specific mode.
MQTT integration: If you're running Home Assistant or another home automation system, add MQTT support to control the lights from your dashboard. I did this with my temperature sensors and it's easier than you'd think.
What Else Can You Do With This?
While I built this for my daughter, the same concept works for:
- Model railway crossings (use the traffic light mode with realistic timing)
- Meeting room status indicators (green = available, red = busy)
- Visual status display for home automation (map different colors to different states)
- Teaching kids about traffic safety
The web interface and multiple modes make it surprisingly flexible.
A Word on Security
Since this is on your network, a few quick tips:
- Use a strong WiFi password (you should already be doing this)
- If you're paranoid, put IoT devices on a separate network
- The code includes OTA password protection. Just make sure you set a strong password and generate its MD5 hash
For a toy traffic light, I wouldn't lose sleep over it. But if you're building something that controls actual home systems, take security seriously.
Wrapping Up
That's the project. Total cost was maybe $10-15 for the parts, took a couple hours to put together (mostly because I was learning OTA updates as I went), and my daughter still plays with it weeks later.
What I like about this build is it's genuinely useful as a template. Physical buttons plus web interface plus OTA updates, that pattern works for tons of projects. Swap out the traffic lights for relays and you've got smart home controls. Add sensors and you've got a monitoring station. The ESP32 is powerful enough to handle a lot.
If you build this, feel free to reach out. I'm curious what people do with it.
Resources
- CH340 Driver Guide: How to Install CH340 Drivers
- ESP32 Docs: Espressif Official Documentation
- Arduino Reference: Arduino Language Reference
If something doesn't work, check the troubleshooting section or open the Serial Monitor. It'll usually tell you what's wrong.

Member discussion