Baremetal Kubernetes Storage: NFS Setup with Unraid (Part 1)

Part 1 of the Kubernetes Storage Series
The Problem I Needed to Solve
I've been running Kubernetes on baremetal in my homelab - multiple Proxmox nodes, an Unraid server for storage and backups, and a cluster built using my Kubernetes-ready Ubuntu templates. Everything worked well until I tried deploying applications that needed to persist data.
That's when the ephemeral nature of pods became a real issue. Pods get killed, rescheduled, moved between nodes - and when that happens, any data stored inside them is lost.
For stateless applications like nginx or a simple API, this isn't a problem. But what about databases? Media servers like Plex? Applications that store user uploads? I needed persistent storage that made sense for a baremetal homelab setup.
After researching and testing different approaches, I settled on two solutions: NFS (which I already had running on my Unraid server) and Longhorn (a distributed storage system that runs inside the cluster). This article covers NFS - Part 2 will explore Longhorn.
How Kubernetes Handles Storage
Before getting into the setup, here's a quick overview of how Kubernetes manages storage. The system uses three main components:
- PersistentVolume (PV) - The actual storage resource. This could be a folder on your NFS server, a local disk, or cloud storage.
- PersistentVolumeClaim (PVC) - A request from your application saying "I need 10GB of storage with read-write access"
- StorageClass - Defines how storage gets provisioned automatically when claims are made
Think of it like renting storage space. The PV is the physical unit, the PVC is your rental agreement, and the StorageClass is the property management company that handles provisioning new units when tenants show up.
┌─────────────────────────────────────────────────┐
│                   Your Pod                      │
│  ┌─────────────────────────────────────────┐    │
│  │  Container                              │    │
│  │    └── /data (mounted volume)           │    │
│  └─────────────────────────────────────────┘    │
└─────────────────────┬───────────────────────────┘
                      │
                      ▼
┌─────────────────────────────────────────────────┐
│  PersistentVolumeClaim (PVC)                    │
│  "I need 10GB of storage with ReadWriteOnce"    │
└─────────────────────┬───────────────────────────┘
                      │
                      ▼
┌─────────────────────────────────────────────────┐
│  PersistentVolume (PV)                          │
│  Actual storage resource (NFS, local, cloud)    │
└─────────────────────────────────────────────────┘
Once you define a StorageClass, Kubernetes handles provisioning automatically. You set it up once, and new storage gets created whenever your applications need it.
Storage Options for Baremetal Kubernetes
When you're running on baremetal without cloud providers, your storage options look different. Here's what I evaluated for my homelab:
1. Local Storage
Storage directly attached to a node's filesystem - like an NVMe drive or a dedicated partition on your Proxmox host.
Advantages:
- Fastest performance (no network overhead)
- Simple to configure
- No external dependencies
Drawbacks:
- Data is tied to a specific node
- If the node fails, data may be lost
- Pods can't freely move between nodes
I use local storage for caching and test deployments. For anything that needs to survive a node reboot or migration, it's not suitable.
Example StorageClass: local-path, local-storage
2. Network File System (NFS)
Shared storage over the network from a central server. This is what I'm using with my Unraid box.
Advantages:
- ReadWriteMany (RWX) - Multiple pods can read and write simultaneously
- Data lives on a separate server (survives node failures)
- Capacity is limited only by your NFS server
- Centralized backups are straightforward
Drawbacks:
- Network latency adds overhead
- Single point of failure (the NFS server itself)
- Not ideal for high-IOPS workloads like databases
NFS is excellent for shared configuration, media files, logs, and backups. Since I already had Unraid running with plenty of storage, this was a natural fit.
┌─────────────┐     ┌─────────────┐     ┌─────────────┐
│   Pod A     │     │   Pod B     │     │   Pod C     │
│  Worker-1   │     │  Worker-2   │     │  Worker-3   │
└──────┬──────┘     └──────┬──────┘     └──────┬──────┘
       │                   │                   │
       └───────────────────┼───────────────────┘
                           │
                    ┌──────▼──────┐
                    │  NFS Server │
                    │  (Unraid,   │
                    │   Synology, │
                    │   etc.)     │
                    └─────────────┘
3. Distributed Block Storage (Longhorn, Rook-Ceph)
Storage that replicates data across multiple nodes in your cluster. This is what I'll cover in Part 2.
Advantages:
- High availability (survives node failures)
- Automatic data replication
- Self-healing (rebuilds replicas when a node dies)
- Built-in snapshots and backups
Drawbacks:
- Uses storage on each node (3 replicas = 3x storage consumption)
- More complex to set up and manage
- Resource overhead (CPU, memory, network)
This is where Longhorn comes in. For databases and applications that need high availability, distributed storage makes more sense than relying on a single NFS server.
┌─────────────────────────────────────────────────┐
│           Longhorn Volume (10GB)                │
│                                                 │
│  ┌─────────┐   ┌─────────┐   ┌─────────┐        │
│  │Replica 1│   │Replica 2│   │Replica 3│        │
│  │Worker-1 │   │Worker-2 │   │Worker-3 │        │
│  │  10GB   │   │  10GB   │   │  10GB   │        │
│  └─────────┘   └─────────┘   └─────────┘        │
│                                                 │
│  Total disk used: 30GB for 10GB of data         │
└─────────────────────────────────────────────────┘
4. Cloud Provider Storage
Storage provided by cloud platforms (AWS EBS, GCP Persistent Disk, Azure Disk). Obviously not relevant for a homelab, but worth mentioning for completeness.
Advantages:
- Managed by the cloud provider
- Easy integration with managed Kubernetes (EKS, GKE, AKS)
- Snapshots and backups often included
Drawbacks:
- Cloud-specific (not portable)
- Cost per GB
- Typically ReadWriteOnce only
5. Object Storage (S3, MinIO)
Data stored as objects rather than files or blocks. You could run MinIO in your cluster for S3-compatible storage.
Advantages:
- Virtually unlimited capacity
- Built for durability
- Great for backups and archives
Drawbacks:
- Not a traditional filesystem (can't mount directly as a volume)
- Higher latency for small operations
- Applications must use the S3 API
I may set up MinIO later for backups, but it's not a replacement for block or file storage.
Understanding Access Modes
When creating a PVC, you need to specify how pods can access the storage. This matters more than you might think - I learned this the hard way when a deployment kept failing because I requested RWX on storage that only supported RWO.
| Mode | Short | Description |
|---|---|---|
| ReadWriteOnce | RWO | Single node can mount read-write |
| ReadOnlyMany | ROX | Multiple nodes can mount read-only |
| ReadWriteMany | RWX | Multiple nodes can mount read-write |
Not all storage types support all modes:
| Storage Type | RWO | ROX | RWX |
|---|---|---|---|
| Local | ✅ | ✅ | ❌ |
| NFS | ✅ | ✅ | ✅ |
| Longhorn | ✅ | ✅ | ✅* |
| Cloud Disks | ✅ | ❌ | ❌ |
*Longhorn RWX requires additional configuration
This is one of the main reasons I went with NFS for shared storage - it natively supports RWX, which means multiple pods across different nodes can read and write to the same volume simultaneously.
Setting Up NFS Storage with Unraid
Here's how I configured NFS storage for my Kubernetes cluster using my Unraid server. The same process applies to Synology, TrueNAS, or any other NFS-capable system.
Prerequisites
- Kubernetes cluster running (I'm using the Ubuntu templates I created earlier)
- NFS server with a shared folder
- Network connectivity between your K8s nodes and NFS server
Step 1: Install NFS Client on All Nodes
Each Kubernetes node needs the NFS client packages. If you're using my Proxmox templates, you can add this to the template script. Otherwise, SSH into each node:
# On Ubuntu/Debian
sudo apt update
sudo apt install -y nfs-common

# On RHEL/CentOS
sudo yum install -y nfs-utils
Step 2: Configure Your NFS Share
On Unraid, creating an NFS share is straightforward through the web UI. Go to Shares, create a new share (I called mine k8s-storage), and enable NFS export.
For other systems, you'll need to edit /etc/exports:
# Example /etc/exports entry
/mnt/k8s-storage 192.168.xx.0/24(rw,sync,no_subtree_check,no_root_squash)
A few notes on these options:
rw- Read-write accesssync- Write data to disk before responding (safer, slightly slower)no_subtree_check- Improves reliabilityno_root_squash- Allows root access, which Kubernetes needs for proper volume permissions
Step 3: Test NFS Connectivity
Before configuring Kubernetes, verify that your nodes can actually reach the NFS share. SSH into one of your worker nodes and test:
# Create test mount point
sudo mkdir -p /mnt/test-nfs

# Mount the NFS share (replace with your NFS server IP)
sudo mount -t nfs 192.168.xx.xxx:/mnt/k8s-storage /mnt/test-nfs

# Test write access
sudo touch /mnt/test-nfs/test.txt

# Cleanup
sudo umount /mnt/test-nfs
If this fails, check your firewall rules and NFS export permissions before proceeding.
Step 4: Install the NFS CSI Driver
The NFS CSI driver lets Kubernetes dynamically provision volumes on your NFS server. Without it, you'd have to manually create PVs for every volume you need.
# Add the Helm repository
helm repo add csi-driver-nfs https://raw.githubusercontent.com/kubernetes-csi/csi-driver-nfs/master/charts
helm repo update

# Install the driver
helm install csi-driver-nfs csi-driver-nfs/csi-driver-nfs \
  --namespace kube-system \
  --version v4.12.1 \
  --set externalSnapshotter.enabled=false
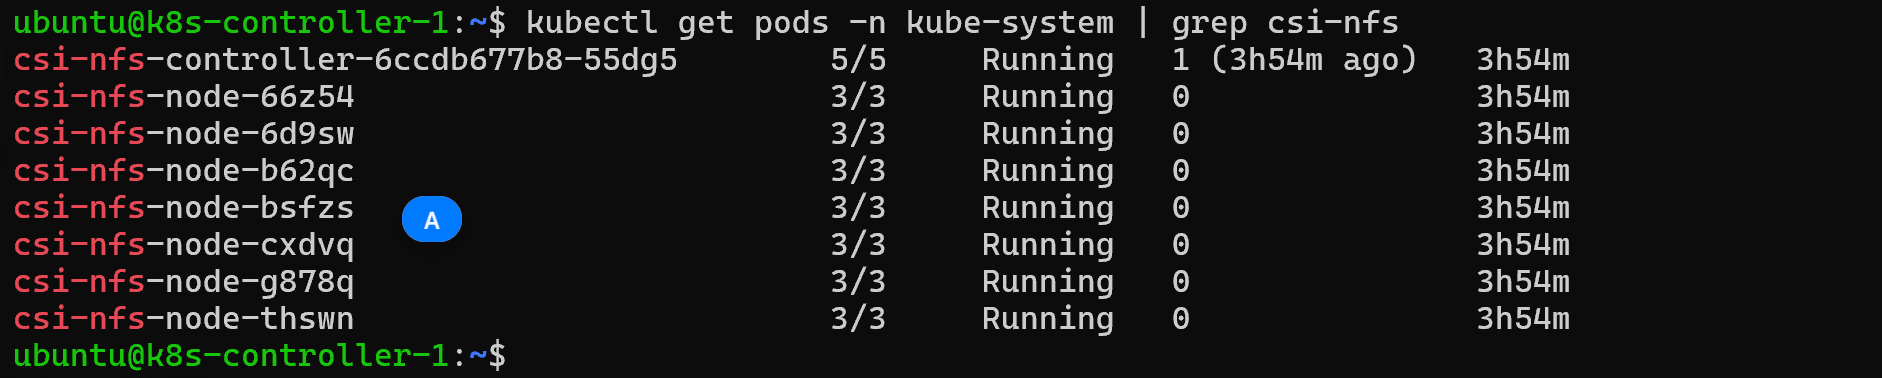
Verify the installation:
kubectl get pods -n kube-system | grep csi-nfs
You should see the controller and node pods running on each of your nodes.
Step 5: Create a StorageClass
The StorageClass tells Kubernetes how to provision storage when applications request it. Update the server IP and share path to match your setup:
# nfs-storageclass.yaml
apiVersion: storage.k8s.io/v1
kind: StorageClass
metadata:
  name: nfs-storage
provisioner: nfs.csi.k8s.io
parameters:
  server: 192.168.xx.xxx      # Your NFS server IP
  share: /mnt/k8s-storage     # Your NFS share path
reclaimPolicy: Delete
volumeBindingMode: Immediate
mountOptions:
  - nfsvers=4.1
  - hard
  - timeo=600
  - retrans=3
Apply it:
kubectl apply -f nfs-storageclass.yaml
The mount options are worth understanding:
nfsvers=4.1- Use NFS version 4.1 (better performance and security than v3)hard- Keep retrying if the server becomes unavailable rather than failing immediatelytimeo=600- Timeout in deciseconds (60 seconds)retrans=3- Number of retries before reporting an error
Step 6: Test with a PVC
Now let's test the setup by creating a PersistentVolumeClaim:
# test-pvc.yaml
apiVersion: v1
kind: PersistentVolumeClaim
metadata:
  name: my-nfs-pvc
spec:
  accessModes:
    - ReadWriteMany
  storageClassName: nfs-storage
  resources:
    requests:
      storage: 10Gi
kubectl apply -f test-pvc.yaml
Step 7: Create a Test Pod
Deploy a simple pod that uses the PVC:
# test-pod.yaml
apiVersion: v1
kind: Pod
metadata:
  name: test-nfs-pod
spec:
  containers:
  - name: app
    image: nginx:alpine
    volumeMounts:
    - name: data
      mountPath: /data
  volumes:
  - name: data
    persistentVolumeClaim:
      claimName: my-nfs-pvc
kubectl apply -f test-pod.yaml
Step 8: Verify Everything Works
Run through these checks to confirm the setup:
# Check PVC is bound
kubectl get pvc my-nfs-pvc

# Check pod is running
kubectl get pod test-nfs-pod

# Test writing data from the pod
kubectl exec test-nfs-pod -- sh -c "echo 'Hello from K8s' > /data/test.txt"

# Verify the file appears on your NFS server
ls /mnt/k8s-storage/
If you see the dynamically created subdirectory on your NFS share with the test file inside, everything is working correctly.
When to Use What
Based on my experience, here's how I'm planning to use storage in my homelab:
| Use Case | Recommended Storage |
|---|---|
| Database (PostgreSQL, MySQL) | Longhorn or Local (single-node only) |
| Shared configuration files | NFS |
| User uploads / media files | NFS |
| High-performance caching | Local |
| Backups | NFS or Object Storage |
| Applications needing HA | Longhorn / Rook-Ceph |
Running Multiple Storage Classes
You don't have to pick just one. In fact, using multiple storage types for different workloads makes a lot of sense:
# Fast tier - for databases that need low latency
storageClassName: local-path

# Shared tier - for files multiple pods need access to
storageClassName: nfs-storage

# HA tier - for critical data that needs replication
storageClassName: longhorn
This is the direction I'm heading - NFS for shared storage and media, Longhorn for databases and stateful applications that need redundancy.
What's Next
In Part 2, I'll cover Longhorn - a distributed storage solution that runs inside your Kubernetes cluster. It provides:
- Automatic replication across nodes
- Snapshots and backups
- Volume cloning
- Disaster recovery
I'll walk through installation, configuration, and how I'm using it for databases that need more redundancy than a single NFS server can provide.
Wrapping Up
Getting storage right in Kubernetes takes some planning, but the concepts are straightforward once you break them down:
- Know your data requirements - Does it need to be shared? Highly available? Fast?
- Pick the appropriate storage type - Local for speed, NFS for sharing, distributed for redundancy
- Use StorageClasses - Let Kubernetes handle provisioning automatically
- Pay attention to access modes - RWO vs RWX affects how you can deploy your applications
For homelabs and small clusters, such as in my case, NFS is a solid starting point. Finally, I have a solid, reliable, persistent storage for my k8s cluster.
That said, I'm aware of the limitations. My Unraid server is now a single point of failure for anything using NFS storage. If it goes down, those workloads go down with it. For my media server and configuration files, that's an acceptable tradeoff. For databases? Not so much.
That's why I'm planning to set up Longhorn for workloads that need real redundancy. It replicates data across multiple nodes in the cluster, so losing one node doesn't mean losing data. I'll cover that setup in Part 2.
Next in series: Part 2 - Longhorn Distributed Storage for Kubernetes - Coming Soon


Member discussion